Showing posts with label rv. Show all posts

Tuesday, December 14, 2010

Inverter and Trimetric meter

Right or wrong, this is how installed them. Works for me.
I installed the XS400 inverter and Trimetric meter that I previously mentioned. It involved mounted two extension cords (one forward to feed the tv and one reversed to feed the transfer switch in the inverter) and two small wires about like phone cable. One phone cable (4 wires) connects the Trimetric meter to the batteries and the other phone cable connects the inverter and remote.


Here are those wrapped with electrical tape.


The 1/8 stiff wires laying under the medal clamps in the packages were wrapped the length of the wires to stiffen them so they would not sag when bolted along the frame with the clamps. After a total of 4 wraps with electrical tape the cables were attached to the frame with the clamps.


This is the "shunt" that in used in the negative battery cable for the Trimetric meter. One of the phone type cables lead (it contains one white, 2black, and one red cable) from the shunt to the Trimetric meter.


This is the fuse that goes in the positive battery cable.


Here is the "shunt" installed. I needed containers to keep everything dry so I used "loaf pans" from the kitchen department of Wal-Mart and cut down a cookie sheet for the top.


This is the fuse installed. The covers will be bolted on the top and everything painted black to blend in.


This is the inverter (an inverter takes 12 volts in and gives 120volt out). The 2 white plugs on the front are the 120volt outlets. One of the two extension cords will plug in and run our tv and satellite receiver, the other will power our laptops, printer, and router.
The black cord plugs into a wall socket and feeds the inverter transfer switch when the camper is plugged in or we are using our generator. The inverters uses regular 120volt power when available and automatic switches to battery power when needed. No need to move the wires from one plug to another.


This is the back of the inverter and show the 12 volt battery lugs (red=positive and black=negative. The small silver lug is a ground for wire for the inverter case.


Here is the inverter installed in a front compartment. The extension cord with the black end is for the tv and the other with the yellow end is for the laptops.


This is the Trimetric meter (showing our batteries are 91% charged) and the remote switch for the Xantrex inverter.

Friday, August 13, 2010

My Battery Pack

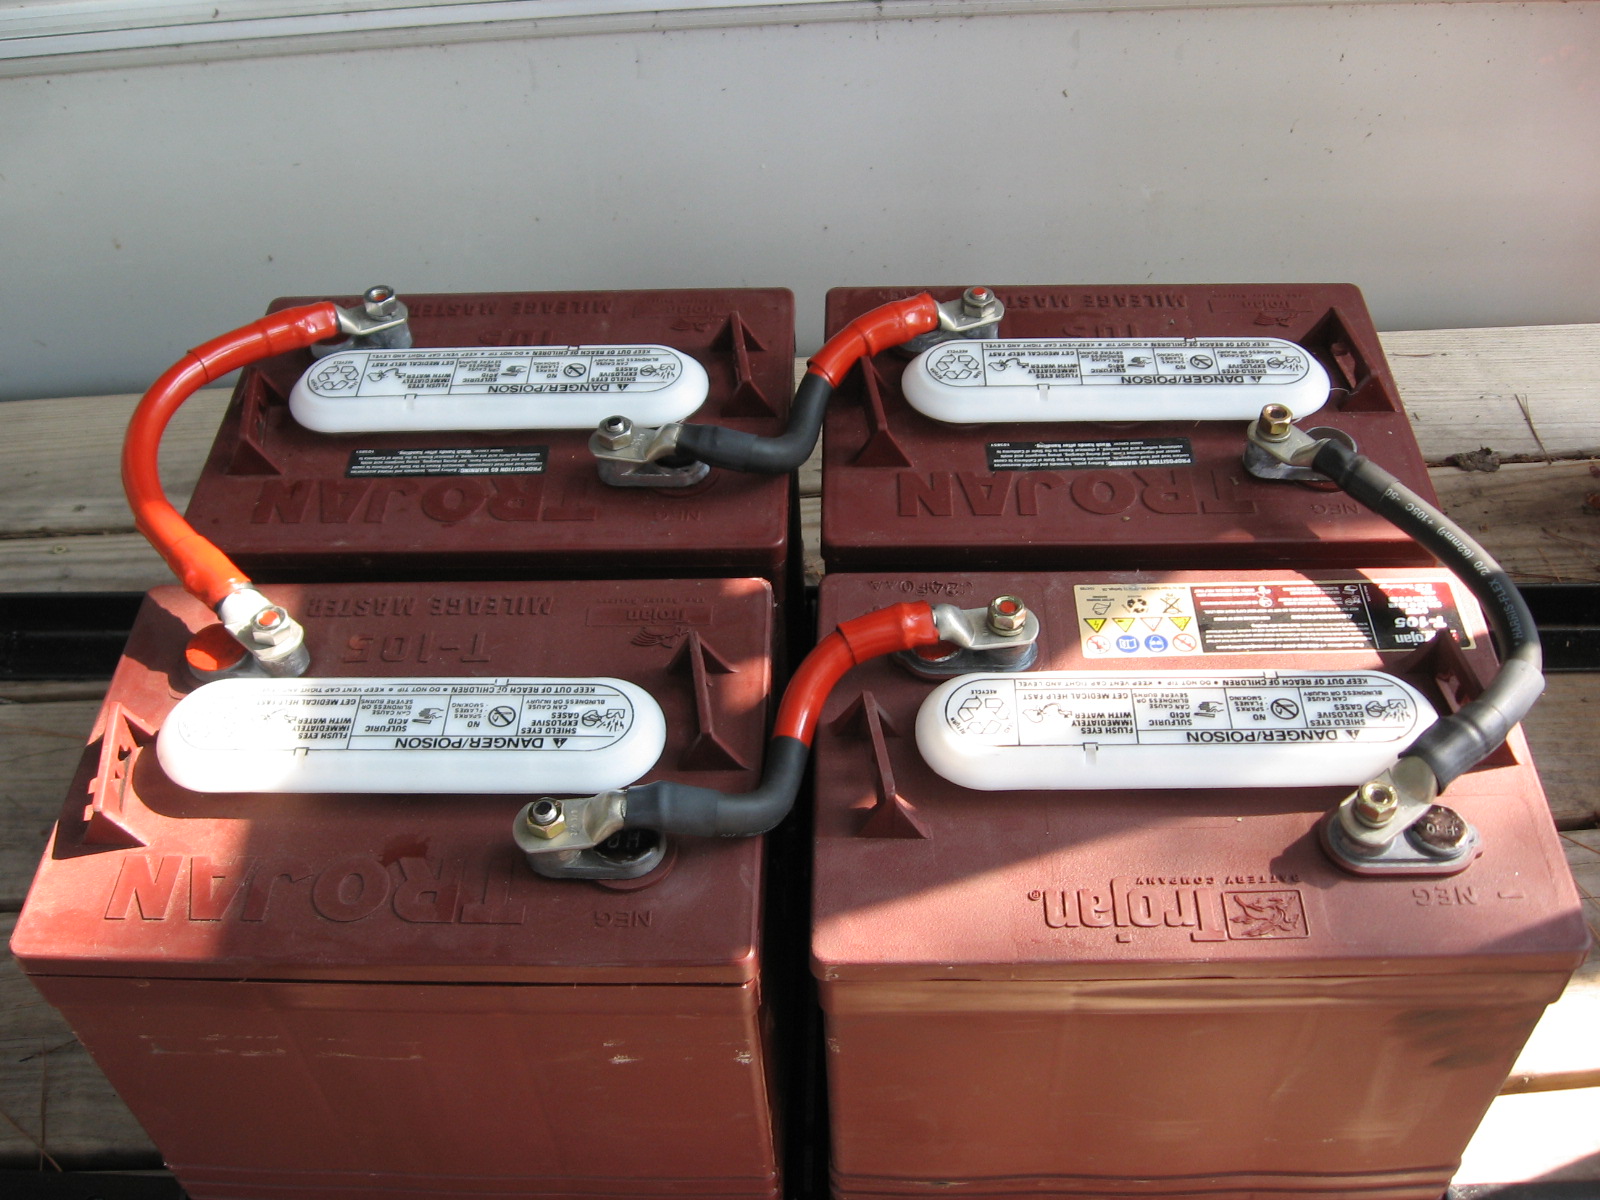
When adding more batteries, the first thing needed is a strong battery rack to secure the batteries. Weight and size requirements have to be taken into consideration. I would have liked at least 600 amps but had to settle for less. I built this angle iron rack to hold four Trojan T-105 six volt batteries. They will be wired "in series" and "parallel".
Each battery is 6 volt and 225 amps. Wiring a pair "in series" gives 12 volt and wiring two "in series" pairs "parallel" give 450 amp. Try to keep your cable as short as possible with a little flex and keep them the same length between batteries. Build your own using flexible welding cable if you have the option.


"in series" means wiring positive(+) to negative (-)
"parallel" means wiring positive(+) to positive(+) and negative(-) to negative(-).
or
"in series" red to black
"parallel" red to red and black to black.
Remember............................................
"in series" adds total number of volts.
"parallel" adds total number of amps.


This is the 12 volt battery that came with our travel trailer. Under each of the two removable caps are three cells (each cell is 2 volts) wired in the battery case "in series", pos(+) to neg(-). Each time you wire "in series" you add the volts. Two banks of three 2 volt cells equals 12 volts.


This is a 6 volt battery with the cap removed and you can see the three 2 volt cells.


This shows two 6 volt batteries wired "in series" to form one large 12 volt battery. Now a total of six ( 3 in each battery) 2 volt cells are wired to form 12 volts. If you couldn't see the half red-half black cable in the middle, it would look like a standard 12 volt battery. Positive on the upper left and negative on the lower right.


This photo shows how this setup (now one large 12 volt battery) would be hooked up if this was all you were using. Positive (red) cable on the upper left and negative (black) cable on the lower right side.


I have now doubled the two battery setup and the red cable on the left and the black cable on the right are wired "parallel" (pos to pos and neg to neg). Just like your dad taught you to use "booster cables", red to red and black to black. Now this forms one very large 12 volt battery bank.


To hook up this battery bank you will want to use the positive and negative posts that are the farthest apart, thus drawing current from all over the battery pack, this photos shows the positive (red) cable attached to the upper left and the negative (black) cable attached to the lower right. Please use an appropriate size fuse in the red cable. The fuse size should be about 20% larger than the amps you will be drawing out of the battery bank at any given time.


With a multimeter attached to the red and black cable you can read 12 volts.
This battery bank and rack weighs about 250 pounds. Just remember even if I have 450 amps in the batteries, I can only safely use 225 amps ( only use 50% or less) if I want the batteries to last.

Thursday, April 01, 2010

Tri Metric 2025RV meter

What the heck is a TriMetric 2025rv meter? The simply answer is to call it your fuel gauge for you batteries. The fuel in your batteries is measured in reserve amp hours and the 2025rv meter keeps track of them just like your gas gauge in your car. Use some amps out of your batteries and put some back in by charging them and you will always know to total with this meter.


There are numerous web sights that explain the technicals so I will just do a broad overview.

It is easy to shorten the life of your batteries by using more than 50% of the amps in them. If you have a reserve of 200 amps hours then use less than 100 amps before recharging them, even less is better.

The 2025rv meter by Bogart Engineering is a newer and improved version of their 2020 meter. It has its own housing that will blend right in with my furnace and Fantastic Fan thermostat housings.


It has built in lightning protection and several other features that make it more desirable.

As always, I researched online and found the users manual (had to make sure it would do what I wanted) and installation manual (see if I could install it) before placing my order.


While this meter neither makes or dispenses 12 volt electricity, it is still money well spent (about $200 for meter, shunt, and wiring) if you are planning to camp without hookups and run off your batteries.


Imagine driving a car with no gas gauge and not knowing the last time any was put in the tank.


Thursday, January 10, 2008

Fan-Tastic

Actually that is the brand name of the vent fans in the ceiling of our rv. Fan-Tastic fans are the standard by which all other fans are judged.

For my non rv readers I will explain their use. They work the way "attic fans" work in an ordinary home. All rvs have a vent fan in the bathroom to pull the steam from the shower.


Most are just a small single speed fan in the 14"x14" opening the will not do a great job. The vent is cranked open and the fan automatically starts turning.


Our Fan-Tastic vent fan in the bathroom is full size to the opening and has 3 speeds plus "off". Select any of the 3 speeds and open the vent and the fan starts or you can place the switch to off and open it without the fan running (more on that later).


All controls are manual. I can reach them but the short one of the family has to use a pair of kitchen tongs to open it by placing the tongs on the black star shaped knob and turning it.


We ordered an automatic fan for the kitchen vent (the stove also has a vent-a-hood). It has a "rain sensor" that will automatically close it if it rains and it will reopen when the sensor dries.


This fan is controlled thermostatically by this wall unit (it can also be manually operated). In "auto" mode you can set the desired "temp and humidity" and the fan will open and run on high until it is reached. In "manual" mode the fan opens and runs on low until you choose to turn it off.

When using the kitchen fan, you can open a window or a door to receive a nice breeze. When the awning is out you can draw in the cool breeze it creates. Also you can just open the bathroom vent with the fan turned off to receive a breeze if you want to keep the doors and windows closed.

These are 12volt fans so they can be used (rvs have 12 batteries attached) even when you are not hooked to regular 120 volt power.

These fans are very powerful and really move a lot of air inside a rv. Roughing it in an rv with the comforts of a attic fan.

Tuesday, January 08, 2008

Putnam Hitch

Back in August when I bought my 2006 Dodge 2500 diesel truck, I knew I wanted to install a better trailer hitch.

The stock hitch was not heavy enough ( I didn't want to max it out) for our 32ft travel trailer. After doing some research I decided on this hitch. The Putnam 25211 is rated at 16000 pounds when used with a weight distribution system.


The hitch arrived with part of the nuts, bolts, and washers missing (the box had a hole in it). The first thing was rounding up the missing parts before starting.


These are the nuts, washers, and bolts needed to install the hitch. Also these pipe bushings were needed. Only 2 bushings are needed for my truck. A Dodge 1500 requires the other two.


This is the hitch and the 2 mounting plates.


The two mounting brackets are installed with 4 bolts per side. Depending on your truck (longbed or short), you use the front or rear holes.

I now turned my attention to my truck .


First I removed the spare tire and unclipped the wiring harness for the lights.


The receiver part of the stock hitch ( also serves as on additional rear frame crossmember so only the receiver part is cut off) has to be removed. This picture also shows the part of the original hitch that the new hitch ties to.


I torched it off and then cleaned it a little after this picture was taken. The rest of the stock hitch is left in place because the new Putnam hitch ties into it.


These 2 bumper bolts (one on each side with the tab attached) need to be removed.


Push the clips that hold down the plastic in the bumper upward and it reveals the holes that will tie the two hitches together. This is the part of the original hitch where a regular trailer ball is attached.


These are the bolts that are used.

I used a floor jack to lift the new hitch in place and then reused the 2 bolts I had removed earlier (pipe spacers were already built in on the 3/4 top truck). One additional bolt per side is added to the provided holes.


The front holes on both the hitch and frame are elongated.


These bolts, washers ( I added and additional washer inside and out to beef it up) and bushing are used. The bushing fit inside the frame to keep it from collapsing.


After every thing was in place I started tightening all the bolts.


Starting with the 2 bolts that tie the two hitches together. After everything is tight, I plastic z-tied the wiring harness snug.


Here you can see both hitches tied together. My R265/17 spare tire fit but not sure if a larger tire would.


The finished product looks great and I now have all the hitch I need. It took about 3 hours but I really took my time and that included rounding up the missing parts. Without a floor jack or a helper, the hitch would be difficult to hold in place to start the bolts. This thing is very heavy.
 

Free Web Counters
South Beach Diet Food